Tuesday 23 April 2024

The home front

There’s not much wargaming or painting going on over here at the moment, and god knows when my 6mm Baccus Lancastrian army will show up, so I’ve decided to close up shop for a couple of months while I generate a few things to write about (if Stew can do it so can I). 

If nothing else I should have a few ECW battles and an airship mission or two to kick things off again when I return.

As an early retiree on a limited income (cue the playing of a very tiny violin) I sometimes have to make difficult decisions on how to spend my hobby money. This month (in a spend I shall have trouble categorising for the wargaming census) I err spent it on a couple of birds…

Literally.

Meet my two new family members, Bancroft and Makepeace. 

Bancroft & Makepeace. Hanging out with chickens can be very restful. 

They’re a pair of fancy pants chucks, Bancroft is a Brahma and Makepeace is a Favorolle - not that you’re especially interested I’m sure. 

Makepeace doing a runner after taking a dump in my welly.


Being French they immediately went on strike over the lack of adequate wi fi in their enclosure, so no eggs of note so far.

Les Poulets avec les gilets jaunes. It’s a French thing.

Hopefully they won’t start blocking access to the garden or burning tyres.

Have a great summer everyone. 

Toodleooh.


Friday 19 April 2024

Gas bags over Lovitznia

As I revealed in an earlier post I have a bit of a “pash” for airships and especially fantasy / steampunk ones. Since Christmas I’ve been running a smallish campaign covering the 1890´s aerial conflict between the two Eastern European Imaginations of Maltovia and Lovitzna so I thought I’d bore the arse off everyone with a few piccies and a brief description of what’s what. If nothing else it’ll be a break from the ECW. 

Variety. 

You know.

Spice of life and all that.

Anywhoo…

The two countries (Maltovia and Lovitznia) were borrowed from my Penguin paperback copy of Capt W.E. Johns “Biggles Goes To War”. I was a big Biggles fan when I was little, which probably explains a lot.

Maltovia and Lovitznia’s border is long and difficult to traverse. In the south the two countries are separated by a high mountain range and in the north the border is marked by a thirty mile stretch of the river Dniepr.

In 1888 the Lovitznian High Council agreed the funding and construction of the Lovitznia Maltovia Friendship Bridge and by mid 1891 where my campaign begins it has finally been completed.

Not long after the bridge is finished the Maltovian government receives intelligence that the Lovitznian army is conducting “manoeuvres” within striking distance of the crossing. Reconnaissance by the Maltovian’s sole Aeroleve confirms the situation. The Lovitznian ambassador is summoned but denies any ill intent on behalf of his country. Maltovia begins to mobilise its small and ill equipped army and hurriedly arranges the purchase of a single outdated Montgolfier class cruiser recently decommissioned by France. Within days of its arrival it is pressed into service on a desperate mission.

The Maltovian high command concludes that only way to halt a Lovitznian invasion is to take away the ability to cross the Dniepr in any numbers. The shiny new bridge would have to go.

On June 4th 1891 the two machines of the Maltovian airforce took to the sky and headed east, the mew cruiser laden down with a clutch of bombs and the escorting aeroleve carrying half a dozen rockets. 

The rules used were my favourite Galleys and Galleons, modified for hexes and with the combat system changed to better suit my needs. So barely Galleys and Galleons at all come to think of it. 

The Montgolfier Class Cruiser (left - painted in Maltovian colours) leaving a cloud bank at high altitude and heading east at a tear arsing 40kmh. On the right is the Maltovian aeroleve (body of a small airship but fitted with wings to aid lift) and its battery of six forward firing rockets.

Seems the Lovitznians have also been shopping for an air force. This patrolling Danube class vessel could put a spanner in the works!

“And there’s more” - as Jimmy Cricket used to say. An ex Austro Hungarian Pfeil class vessel comes in as a Lovitznian back up.

Over the target. The Maltovian airforce scores two bomb hits on the bridge. Not enough to destroy it on this occasion but enough to prevent its use until its repaired. On the right the aeroleve fires a rocket (and misses).


The aeroleve attempts to pop a cap in the Lovitznian’s ass again (as I believe my American cousins might say) and misses (once more).

Now that the gloves have come off the Lovitznian airforce responds in kind. But un obligingly doesn’t miss.

Stat card for the Maltovian cruiser. Red dice indicates activation limiting damage and the two home made counters show damage to the engines and the command crew.

Job done, both Maltovian vessels high tail it for the exit and slip away without any further damage. I think it’s fair to say the Lovitznian Embassy won’t be hosting any more “cocktails and canapés” friendship nights in the near future.

Toodleooh. 


Sunday 7 April 2024

The king is dead long live the err…

Woe woe and thrice woe. 

Erm… alas and alack…etc.

I think this pamphlet produced in Birmingham probably explains it all. 


In other news the positions of major garrisons in Spring 1943 is shown below. The Parliament expanded its holdings in the North West and the Royalists pushed north east to establish a chain of allied settlements between the midlands and the other Royalist powerhouse in York.


Royalist recruitment has picked up and revulsion over the kings death during Parliaments brief custody has led to a number of political splits within its higher echelons. Since the Royalists now have a martyr for the cause, the main question amongst many of parliaments grandees is what to do with the Monarchs body?


Rupert and the Generalissima are determined that Charles’ death will not be in vain. The Royalist forces have suffered two major defeats but now have enough recruits and arms to make another effort. As spring gave way to early summer, camp fever began to swell within the royalist ranks forcing Rupert to march out of Birmingham at the head of a significant host. Parliaments leading generals hurriedly convened in London with but one question on their lips. Where could he be headed?

Toodleooh.

Space Nazis next methinks.

Tuesday 26 March 2024

ECW Campaign. Battle 2. The fat lady sings - Winterton


Get yer microscopes out lads…it’s time for another migraine inducing squinty eyed 2mm battle, brought to you via Broomtech’s latest crapovision technology. (Teeny weeny figures, crap lighting and dodgy iPad camera).

Background fluff

Spring 1643 saw the re emergence from winter quarters of both armies. With his supply lines constantly ravaged by parties of Royalist horse, Parliamentary General Waller continued to slowly retire from the midlands towards the Thames Valley. His brief occupation of Coventry and Banbury had rattled the King in his new Birmingham capital but had been unsustainable with the majority of resources now redirected towards General Essex in the south. 

Meanwhile in Birmingham Queen Henrietta Maria had been more than a little disappointed in her husbands lack of martial prowess and had chided him, continuously, to do something material to advance his cause. Party to some of her majesties more caustic comments Rupert suggested that Charles could take part in the ongoing pursuit of the retiring General Waller. Perhaps keen to escape his wife’s opprobrium Charles agreed. 

In early April the Kings new horse heavy field army approached the tiny village of Winterton surprised to find that General Waller had decided to make a stand on the ridge that ran behind the settlement. It seemed an ideal opportunity to burnish the kings martial credentials and at the council of war, Rupert proposed a bold plan. 

The ridge ahead of the royalist army was bisected by a road and the Parliamentarians had occupied both sides of it. Rupert proposed that he take four of the five cavalry regiments available in order to push the enemy off the rightmost flank. The King could oversee the occupation of the enclosures in the centre ground, fixing the attention of the Parliamentarians while Rupert ran amok. 

These are the two burn cards that the Royalists can play during the game.


And for completeness here are the Parliaments burn cards.

On the Royalist left a force of dragoons, infantry and a regiment of horse under Wilmot were left to fulfil a screening role. Wilmot was a capable commander but under somewhat of a cloud after his participation in the recent southern failure with Hopton.

The battle commenced after lunch with a desultory Royalist canonnade that caused little loss amongst the enemy. 

General Waller was dismayed to see the size of the army before him and even more so when he realised the King himself was leading it. Hurriedly he toured his restive foot and ordered them to dig a ditch the better to defend themselves. Taking up position on the crown of the ridge he watched his own battery of cannon below as they readied to return the royalist barrage. 

Initial battlefield deployments. On the left are the royalists with Rupert in the foreground. On the right Hesselrig’s cuirassiers line the ridge, in the middle are Chudleigh’s infantry and way over in the background is Lord Stamford’s horse.

Seemingly moments later he found himself unhorsed and partially deaf, being ministered to by anxious staff officers. The site occupied by his grand battery of cannon was now a scorched and flattened slope littered with the dead and dying. 

« Ere corporal pass us that briar of yorn…but mind you don’t trip over that budge barrel. Oh eck »

Messengers began to arrive from the Hesselrig’s horse on the left most ridge and Lord Stamford’s horse on the right. Both sought reassurance about Waller’s continued good health but Hesselrig also reported a worryingly large party of enemy horse massing to his front.

And so the battle began in earnest.

On the Parliamentary right Lord Stamford noted the weakness of the Royalist screening force and after approval from Waller led a sudden rush of horse down the ridge into Wilmot’s unsuspecting cavalry. Already weakened by having despatched scouts Wilmot’s men took 75% casualties but stubbornly held their ground. Though successful and suffering minimal casualties it was Lord Stamford’s men that withdrew to reorganise and reload. 

Lord Stamford’s men give Wilmot’s chaps a real pummelling before pulling back to reload. 75% casualties but still holding their ground.

In the centre of the field the Royalist foot advanced and in concert with a regiment of dragoons secured the defensively important enclosures while the King watched on from a small hillock to the rear.

The royalist centre seize the central enclosures then begin a slow advance on the enemy ridge line.

Rupert on the Royalist right had amassed a mighty force of four regiments of horse and as soon as his scouts came back with news of Hesselrigs occupation of the ridge ahead, he gave the order to move out. The cohesion of his advance was interrupted a little when the Parliamentarian cannon chose to immolate themselves but the ride up the gentle slope of the ridge still hit his opponents cuirassier horse with great force. Though his initial units were thrown back they caused some casualties and a great deal of confusion, confusion exploited by Rupert who raced up a small defile to arrive on Hesselrig’s flank. 

Rupert, centre of picture, sends Hesselrig reeling after 2 of his own regiments are beaten back.

Within moments of Rupert’s arrival Hesselrig’s broken squadrons began streaming back towards Waller on the other ridge. Rupert pursued, causing yet more losses until he ran into the hurriedly repositioning foot of Lord Chudleigh. The parliamentarians managed a ragged volley that was enough to throw Rupert’s men back with loss. 

Watching Rupert’s progress Waller began to dictate orders for his army to retire from the field when fate took an unexpected hand.

On the Parliamentary right Lord Stamford’s men were unaware of battlefield developments elsewhere but could clearly see that the Royalist screening force to his front were weak and over extended. Marshalling his two squadrons of horse he urged them forward once more. 

Wilmot’s horse saw them coming this time but aware they were all that was available to block the onrushing enemy they stood their ground. Wilmot and a small group of troopers survived the onslaught but the rest were swept away and Lord Stamford’s men found themselves unexpectedly amongst the enemy baggage train and the King’s entourage. The Royal Standard fell and Stamford was forced to shoot one of his own men who raised his sword to strike the unhorsed King. 

The King’s entourage watch in disbelief as Lord Stamford’s two squadrons destroy Wilmot’s remaining horse and head towards them.


After destroying the Royalist baggage Stamford loops around to attack the Kings party from front and rear. The leader casualty check revealed the King had been killed (two crossed sabres) but I downgraded it to captured as being the more likely outcome.

Apologising profusely to the Monarch, Stamford saw him immediately remounted and then hurriedly rushed him from the battlefield under the protection of every trooper he could still muster. 

Queue fat lady breaking into song.

So, the curse of the ECW campaign strikes again, my first campaign, six years ago, was also cut short by a series of unexpected in game events. 

Doh…

So it’s over…almost before it began.

Or is it?

Here are a couple of options that I’d like your thoughts on. I’ll go with whichever seems the most popular. 

1) Enough with this never ending ECW stuff let’s have some Space Nazis!

2) Carry on with Charles briefly imprisoned but then escaping while dressed as a washerwoman. 

3) The Queen and Rupert ride an upsurge in Royalist support for the shameful handling of the monarch and attempt to free him by continuing the fight.

4) The King agrees a modified list of Parliamentary demands and remains a heavily curtailed ceremonial figurehead. Game over. Parliament automatic win. Until the King does some double dealing in the  future and we get a second civil war I suppose.

5) The Royalist party claims the captured king is an imposter, A « lookey likey » used by Parliament after the real King was bravely killed at the head of his troops. The King’s eldest son is proclaimed King in a low key Birmingham ceremony. The war goes on.

6) Any other outcome you feel you’d like to see…that doesn’t include Space Nazis.

Toodleooh


Saturday 2 March 2024

Yet more ECW - Soz

It’s been a busy couple of weeks here at Maison Broom, what with building works and getting the garden ready for spring. 

The hobby mojo has disappeared entirely for now, but fortunately gaming of sorts has continued through remote stuff with Max Foy and my ECW campaign - an update of which I present below.

Background fluff update.

King Charles was greatly disappointed by the Autumn reversal in the south west and reluctantly instructed Hopton to consolidate the gains he’d made rather than advancing to link up with the Royalist forces around Bristol. 

Fortunately for Hopton all eyes at court were soon focussed on the rapidly approaching army of General Waller. In a few short months the man had marched almost unopposed across the midlands and had garrisoned Banbury and a sympathetic Coventry - right on the doorstep of Charles’ new Birmingham capital. 

Such a situation could not be allowed to stand and the Kings nephew Rupert of The Rhine led elements of the new Birmingham field army to interdict Waller’s extensive lines of supply. By mid December the situation had become untenable and Waller withdrew in good order back towards London. Both abandoned sites were garrisoned by the King within a week of Wallers withdrawal but Coventry, a hotbed of Parliamentary sentiment, was to prove an ongoing problem with numerous acts of dissent and constant heavy handed suppression required to maintain order there.

Anxious to retain some credit at court Hopton eventually coordinated a daring seaborne raid on the isolated Parliamentary garrison in Pembroke south Wales. The destruction caused by his landing parties was only minor but its purpose was a mere diversion, for the main blow came from royalist units marshalled in Carmarthen. The towns distracted defenders were caught off guard and the town fell within hours, extinguishing the last pocket of Parliamentary influence in the Principality. 

In some ways this action was a copy of landings effected by Parliament earlier in November. On that occasion their forces landed by arrangement with sympathisers in Liverpool and by the time Waller had begun to withdraw from the midlands uprisings in Manchester and Preston had raised their own milita and secured the two towns for Parliament's cause.

At the end of the year the situation had largely stabilised and bad weather eventually forced both of the major combatants into winter quarters. Despite having failed to secure an outright victory over each other both sides had cause for some celebration. The King had secured a new capital, and the enormous industrial potential of both Bristol and the midlands - his army though modest in size slowly filling out as recruits drifted in from Welsh towns that were ‘squeezed’ into open support of the Monarch.

Apart from victory in the first major battle, Pym and the Parliamentarians had secured London, opened a second front in the north west and unsurprisingly, given popular sentiment in the region, seen the formation of an Eastern Association of towns geographically secure from the Kings forces. The only fly in the ointment was an unexpected outbreak of belligerent neutrality around Guildford that soon spread to neighbouring Tunbridge Wells. 

On one incursion to secure unpaid taxes, a regiment of trained band soldiers was turned back by nearly 4,000 angry country folk armed with home made weapons and a banner proclaiming…


In Birmingham a new monthly news sheet was launched and its second edition seized on the south eastern discontent with some relish.

The Good burghers of Guildford give Parliament ‘the bird’

With the discontent rumbling on Winter slowly gave way to Spring. New army’s were assembling and plans laid for victory in ’43. 

Areas under control Dec 31st 1642


Toodleooh.


Sunday 25 February 2024

ECW Campaign. Battle 1 — Dunnington Castle (Part 2 of 2)

So in part 1 we were left with the Royalists leading 5 victory points to 2, and both sides needing 8 for an immediate win. 

The only way Parliament could get the extra points after occupying the castle was to cross the river under fire and attempt to kill off more of Hopton’s forces. 

As you may remember, that didn’t turn out to well earlier.

Essex ordered his men to hold and even pull back while he thought the matter through. Time was not on his side, there being only three turns left in the game, and up to this point the brigade activations had been perversely favouring Hopton.

Fortunately for Essex, his adversary decided to help out.

First up was Wilmot who thought he’d have another go at crossing the ford on the Royalist left. The reaction from the enemy horse on the other bank was devastating and Wilmot got away by the skin of his teeth - with a handful of survivors. Essex scored a point for this rash intervention.

Hopton’s plan of occupying the castle, (abandoned early on) seemed possible again now that wall had been breached. Orders were issued to seize the place and Colonel Paulet’s brigade hastened to obey. 

In the time between receiving the order and making any progress to execute it Paulet had been held up by two cavalry attacks across the bridge and the news that Ballard and a battalia of enemy Foote had got in there before him.

Still…orders were orders…and they did have a secret weapon up their sleeve. 

Taking advantage of a lull in the fighting Paulet and his lads marched onto the bridge unopposed and saw the way to the fortress gates were unimpeded.

The next activation was Parliamentary and Essex had no choice but to send his remaining horse regiment on that flank to charge Paulet’s infantry while still in a vulnerable column. 

The outcome wouldn’t have been a good one for the Royalists but even as the horse began to move Paulet used his « Gadzooks » burn card - stopping the enemy in their tracks and allowing him to reactivate his brigade.


Shrugging off desultory fire from the castle walls Paulet’s men made their way around to the breach and the first storming parties went in - safe in the knowledge that reinforcements were crossing the bridge behind them.

Against the odds the storm was a success and Ballard and his Parliamentary troops made a rapid exit through a rear postern gate with only minimal losses. 

Paulet gave orders to man the walls and begin filling the breach, the better to defend themselves. Suddenly  the scores had shifted dramatically. Parliament had just lost the 2 victory points for occupying the castle and the Royalists had gained them. The scores now stood at 7 to 1. 

With but two turns left, a crushing defeat for Essex seemed inevitable. 

And then things changed.

Rapidly.

Regaining the initiative Ballard’s brigade surrounded the castle and staged a storm of their own. Despite the benefit of its stone defences the now defending Royalists took casualties and worst of all their heroic leader Paulet was slain by a shot through his manly breast (he actually fell down the castle stairs clutching a bottle of sack and broke his neck, but hey, details). 

Whenever a unit with a leader takes casualties in combat you have to check if the accompanying leader is hit. You have to be pretty unlucky to get the two crossed sabres required. But unfortunately for Paulet…it is possible

Worse was to come for on the very last turn, Ballard’s brigade re occupied the castle and destroyed the Royalist reinforcements struggling to get off the bridge. The scores swung dramatically the other way. Essex now had 2 points for the castle, 2 points for the destruction of 2 Royalist foot battalia 1 point for killing of Wilmots regiment of horse and 1 point for killing Colonel Paulet. Hopton had 3 points for breaching the castle walls and 2 points for routing the Parliamentary horse earlier. 

Turn 12 ended and the game was over. Neither side had reached 8 points during it for an immediate win but Essex with 6 victory points to Hopton’s 5 was quick to send letters to London proclaiming his triumph. 

With the light fading Hopton’s army conceded the field and made camp three miles south. 

Right oh - were back to the strategic map next. Parliament has six points to spend on it followed by the Royalists three. Both sides will also get a number of guaranteed settlements joining their cause this turn in Cornwall / Wales and in East Anglia / Lincolnshire. 

Observations on the battle. 

Both sides had the flank order option allowing them to send a brigade off board only to reappear later on the other side of the river. Neither took it. It might have prevented the necessity of the opposed river crossing shambles that actually occurred. 

Hopton was able to score 1 point for each hit on the enemy castle walls. He could have just stayed put and chanced his arm on inflicting more hits after causing the breach - though this was not guaranteed of course. He could have brought more guns with him too, though to be fair he didn’t know beforehand that his army would be engaged in a siege.

Both sides stuck to having three brigade commanders but could have had up to 5 if they’d chosen a different force mix. A small brigade of say 2 Foote with an order to flank march at the outset may have been decisive.

Toodleooh.

Friday 23 February 2024

ECW Campaign. Battle 1 - Dunnington Castle (Part 1 of 2)

Welcome to this blogs 100th post. (I know right…who would’ve thought I could keep this volume of drivel going for so long).

We’ll get to the battle in a mo but first off here’s some campaign related background fluff.

King Charles was still setting up shop in a very restive Birmingham when news began to arrive of the bungled assault on Plymouth. A mob of ill disciplined Cornishmen, ostensibly under royalist control had driven off the outnumbered and unsuspecting Plymouth militia and then indulged themselves in a three day spree of looting and arson. The kings response was to appoint a man called Ralph Hopton to organise, arm, and discipline this riotous force.

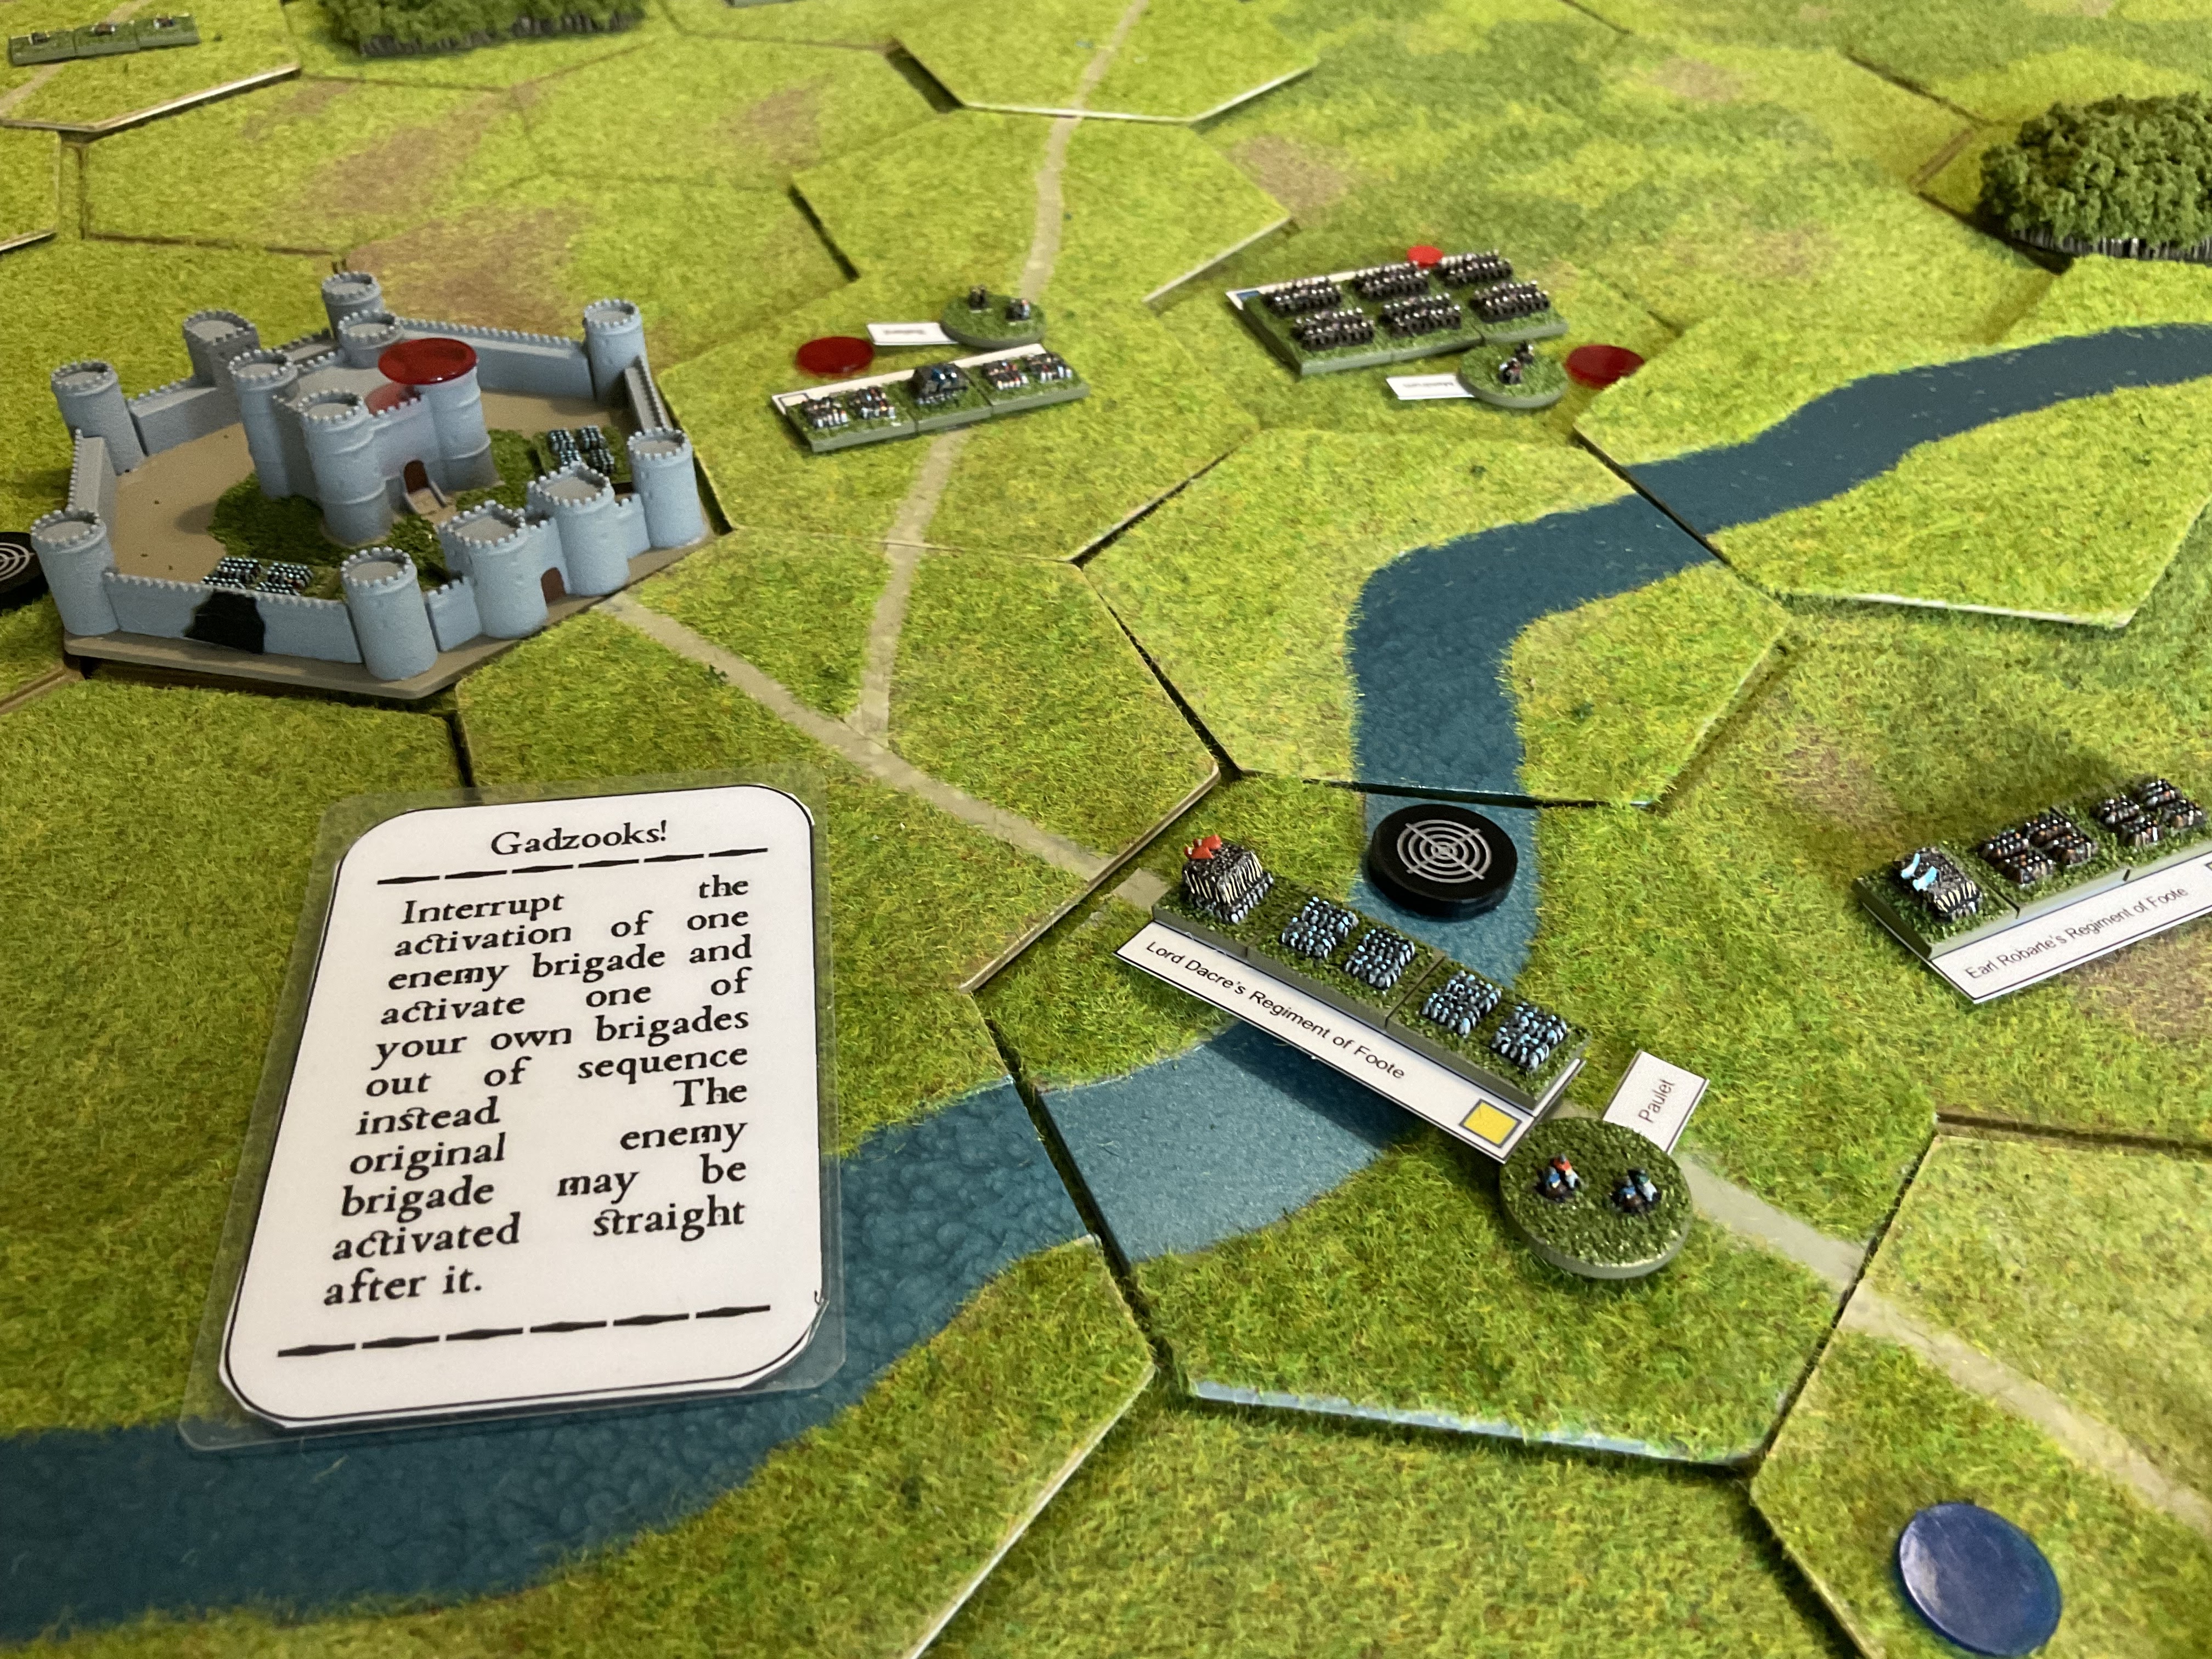
Within a month of Hopton’s arrival he had achieved several minor miracles, the least of which was to motivate enough of the men to leave the county for a negotiated two month period. Crossing the Tamar and marching East towards Bristol they were forced to pass the ancient family seat of the Marquis of Hampton at Dunnington castle. The Marquis was a strong supporter of Parliament and the castles location astride Hopton’s supply lines meant it would have to be reduced or captured. A summons to surrender was met with scorn by Lady Hampton and her small group of defending servants and estate workers. 

In London the rapidly growing Parliamentary army had, it was judged, reached sufficient size to confront and diffuse two threats at once. One portion under General Waller was sent north west to block any moves by the king towards the capital, the other under a disenchanted Essex was sent south west to contain the Royalist presence organising there.

Through diligent scouting Essex’s force caught up with Hopton’s little army on the 24th September, deployed as it was before the castle and unaware of the Earls approach until almost the last minute.

Summoning an urgent council of Warre Hopton abandoned his earlier idea to occupy the fortress and given the poor state of its walls decided to both reduce it with his cannon and hold the Parliamentary forces on the other side of the river while he did so. Orders were issued to seize the ford and the bridge over the river while at the same time battering the old stone walls from outside the range of its defending weaponry.

Royalist Order of Battle:

General - Ralph Lord Hopton with the artillery trayne.

Centre. Colonel Paulet and 8 regiments of Foote organised into 6 battalia.

Left wing. Colonel Henry Wilmot & 2 regiments of horse

Right wing. Prince Maurice & 2 regiments of horse.

Essex also ordered an urgent council of warre and resolved to immediately secure the castle and drive the Royalists from the far bank of the river.

Parliamentarian Order of Battle

General the Earl of Essex

Centre. Colonel Ballard’s Brigade, comprised of 6 regiments of Foote organised into four battalia with two large battery's of gunnes. 

Left wing. Colonel Meldrum & 3 regiments of horse (2 under strength due to detachments sent a scouting).

Right wing. Colonel Sir William Balfour & 3 regiments of horse, (1 under strength due to detachments sent a scouting).

Game notes.

I assigned an arbitrary 12 turns for the battle but since each game turn can be of varying duration I wasn’t sure how much playing time this would involve. As it turned out the battle was split over two evenings.

Forces and scenery are all 2mm scale.

Rules are my own home brew Noe Quarter, allowing limited control of forces by the players once initial orders have been issued to the commanders of the brigades.

Names of all personages are period and factionally correct but regiment / battalia names are made up in case someone complains that their cuffs are the wrong colour.

All battle locations also have made up names and are geographically none specific. 

Though both players were asked to construct an army from a set number of points they have no idea what type of battle they will be asked to fight. It is possible for a force to be badly disadvantaged because of its make up. 

The winner is the first player to reach 8 victory points, with 1 point awarded for each leader or unit destroyed, 1 point for each hit on the castle walls and two temporary points for occupation of the castle itself.

After they had chosen their deployment both players were randomly dealt two burn cards which they could play at any time during the game.

Hopton got these two:

And Essex these two:


A chit for each brigade commander, general, and the castle itself were put into a bag along with an end of turn marker. 

The first one out was for the Royalists who chose to activate their central command with its attendant gunne battery.

The gunnes would score a damaging hit on a 1d6 throw of 5 or 6, and would need three hits to create a breach big enough for any assault. The chances seemed pretty slim, but then on their first ranging shot…

Oh bugger.


In fact the first four turns were very short ones the balance of the activity going to the Royalists. In those four turns Hopton’s lads hit the wall three times causing it to partially collapse. An unexpected breach had been made and an assault was suddenly possible. New orders were hurriedly issued.

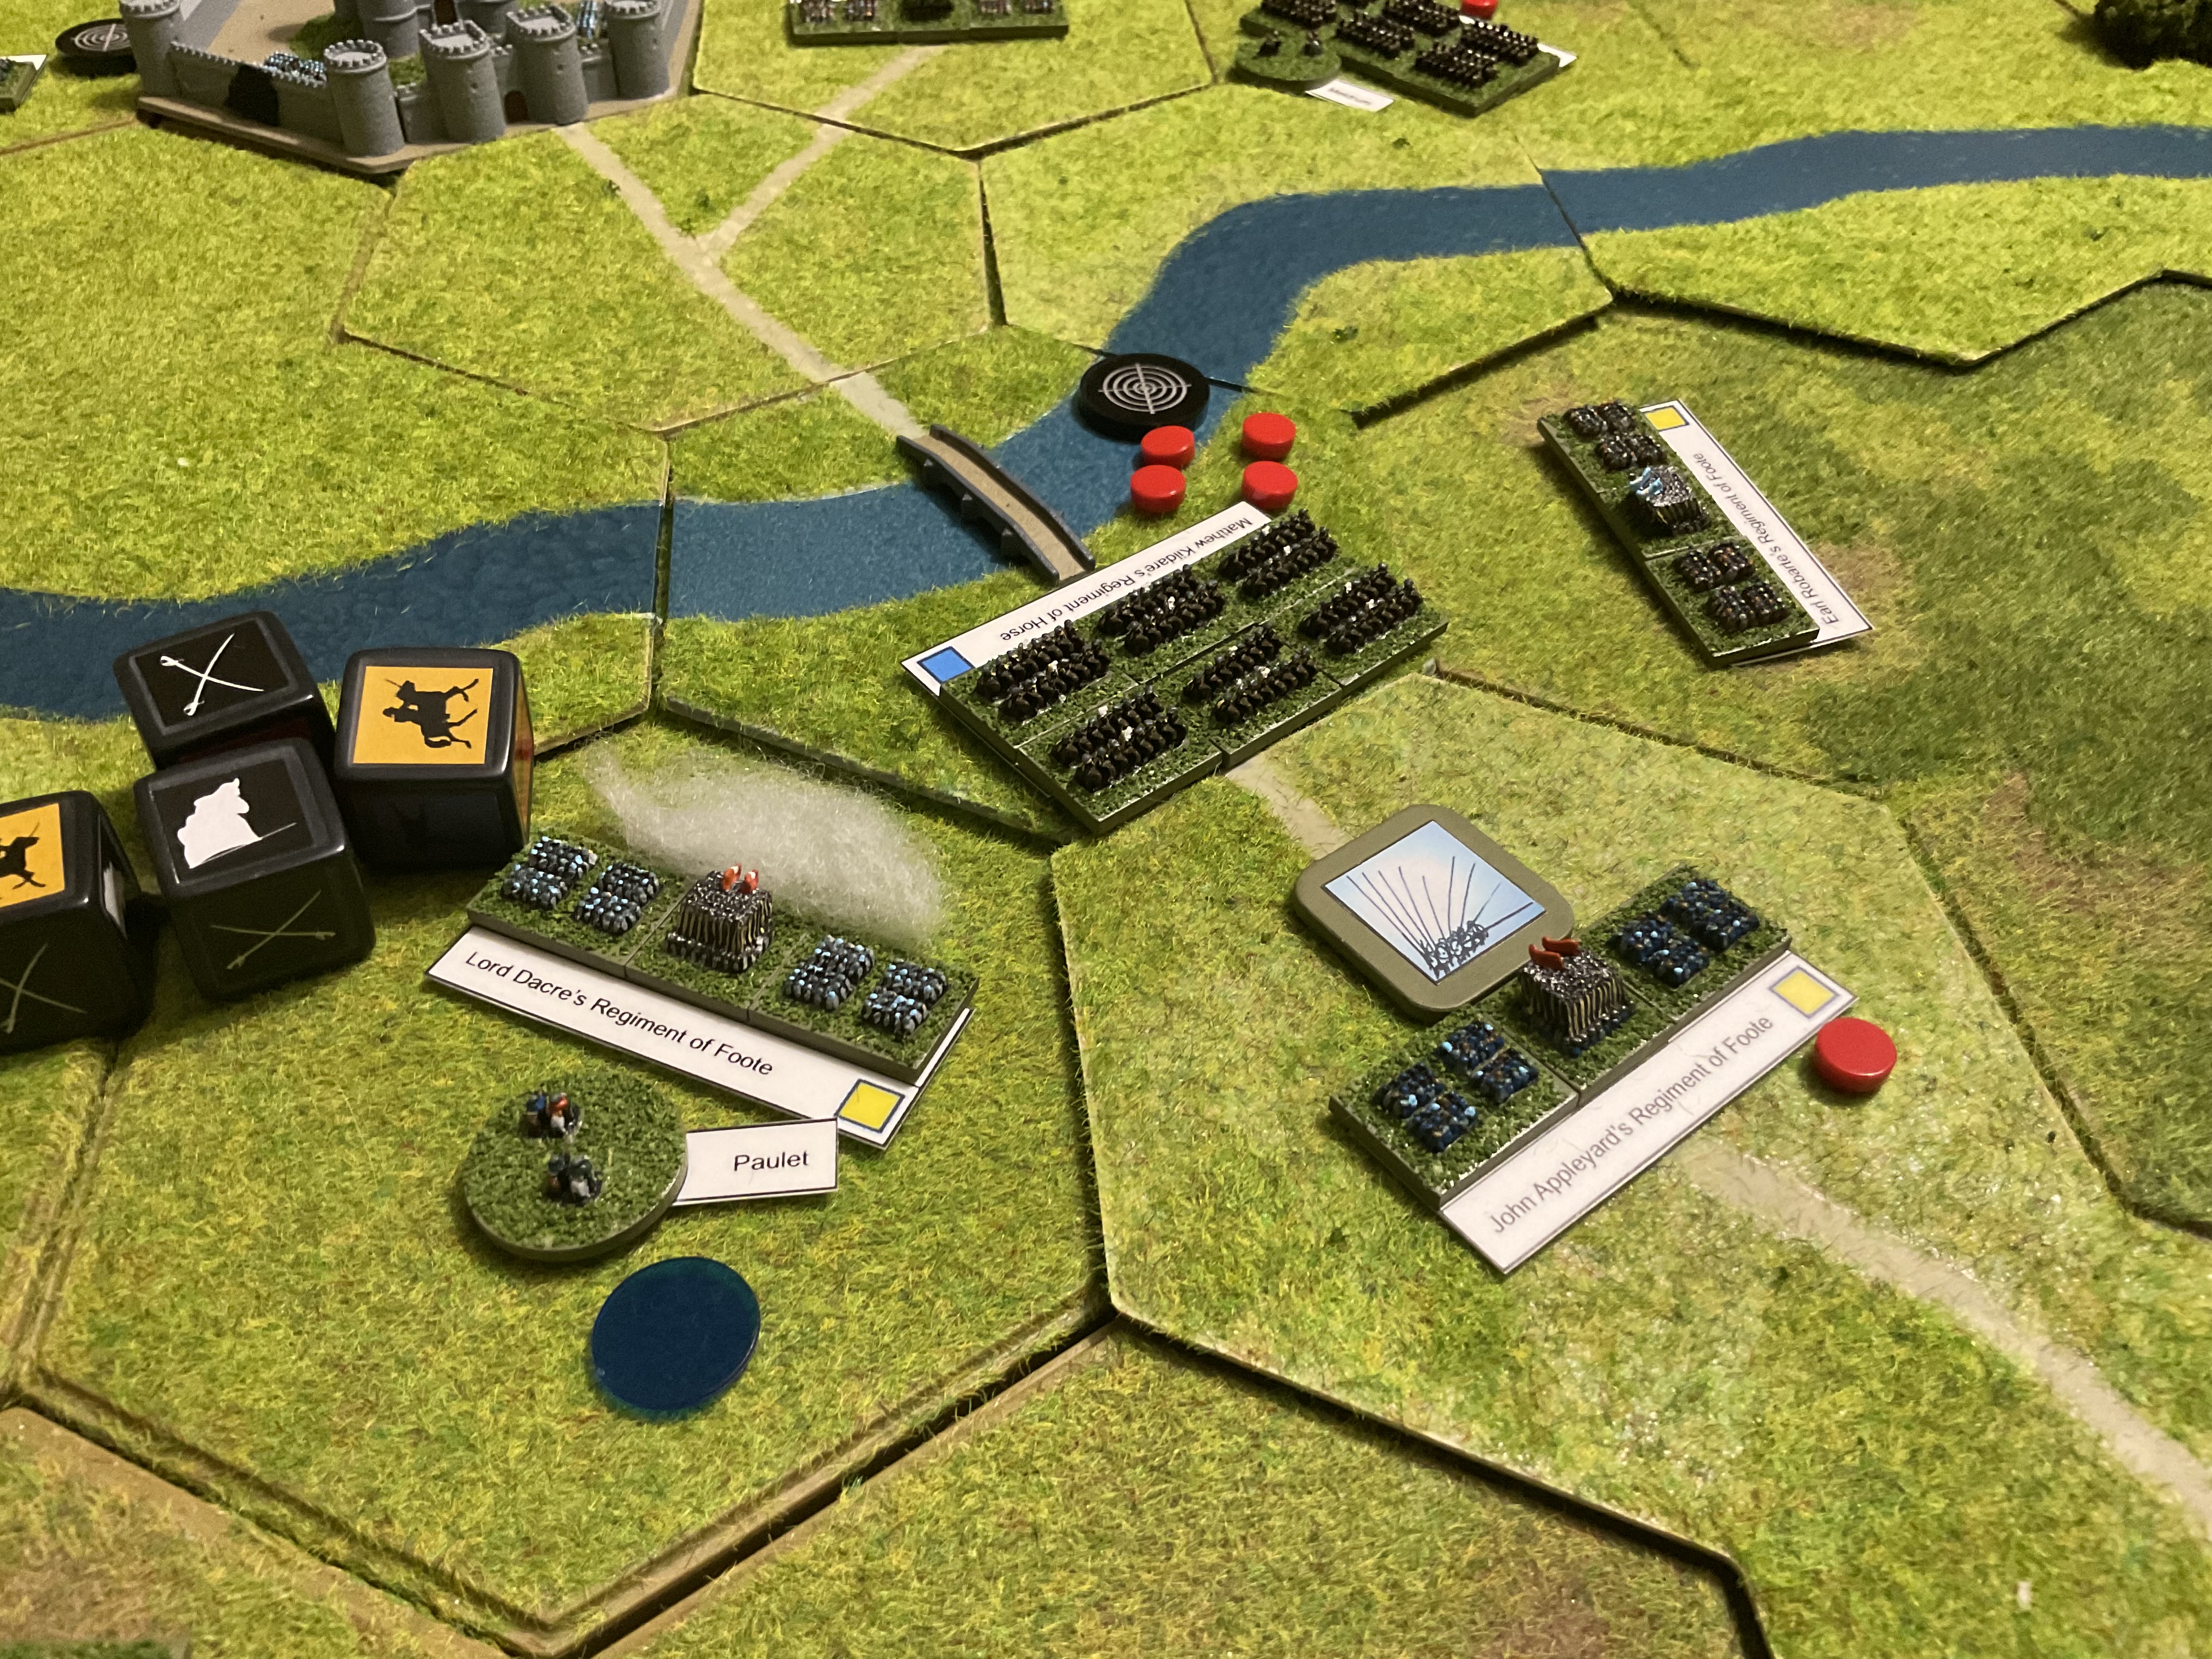
While the guns rumbled and masonry fell, Essex’s men had not been entirely idle. Two of Ballard’s foot marched forward to flank the castle on either side while over on the right Balfour and three regiments of horse made for the ford across the river. Forced to redeploy into column to cross the shallows they ran straight into Henry Wilmot and a regiment of horse.

Wilmot was able to charge straight into the oncoming horse and only Balfour’s steadying presence prevented disaster through a sudden retreat.


Given virtually the same order it became Wilmot’s turn to attempt to seize the crossing point. But for his sins he was facing a far stronger force and he too had to flee back from whence he came…but in his case with 50% casualties.


The whole thing went back and forth a few times until it became clear that forcing the crossing was going to be a meat grinder that neither side could be sure would eventually profit them much.

Sadly this realisation had not transferred to the other wing of Parliament’s army for now it was Meldrum’s turn to attempt the same thing across the bridge. The opposition here were Foote and playing his Pell Mell burn card Meldrum managed to cross the bridge and charge the infantry before they were really where Hopton would have liked them. 


In Noe Quarter infantry are always triggered to try forming a pike hedgehog when charged by horse but to be successful they need to roll 1 flag icon on two C&C Tricorne dice. As you can see they just about managed it and the horse piled into a thicket of pikes. The Royalist Foote took 25% damage but didn’t break while the Parliamentary horse took 50% casualties and were forced to retreat.

The problem was they couldn’t retreat because a follow up horse regiment from the same brigade was blocking their path.  The two hexes they were meant to retreat but couldn’t was translated into hits -making 4 in total and thus ensuring their destruction.

To make matters even worse the unit that had blocked them followed on over the bridge into the same hedge of pikes and additionally two extra Foote battalia that had moved up on either flank. In their turn the Foote managed to score 3 hits on the already under strength horse causing their destruction. 


The only bright spot for Essex was that colonel Ballard had gained entry to the castle with a battalia of Foote - through the breach made by Hopton’s gunners. 


Hopton now had 5 victory points (3 for the hits on the castle wall and 2 for the destruction of two regiments of horse) against Essex’s 2 for occupying the castle. 

A change of tactics was needed by Parliament…but would one be forthcoming?

You’ll find out in part two, sorry, I meant parte ye seconde.

Toodleooh for now.