So in part 1 we were left with the Royalists leading 5 victory points to 2, and both sides needing 8 for an immediate win.
The only way Parliament could get the extra points after occupying the castle was to cross the river under fire and attempt to kill off more of Hopton’s forces.
As you may remember, that didn’t turn out to well earlier.
Essex ordered his men to hold and even pull back while he thought the matter through. Time was not on his side, there being only three turns left in the game, and up to this point the brigade activations had been perversely favouring Hopton.
Fortunately for Essex, his adversary decided to help out.
First up was Wilmot who thought he’d have another go at crossing the ford on the Royalist left. The reaction from the enemy horse on the other bank was devastating and Wilmot got away by the skin of his teeth - with a handful of survivors. Essex scored a point for this rash intervention.
Hopton’s plan of occupying the castle, (abandoned early on) seemed possible again now that wall had been breached. Orders were issued to seize the place and Colonel Paulet’s brigade hastened to obey.
In the time between receiving the order and making any progress to execute it Paulet had been held up by two cavalry attacks across the bridge and the news that Ballard and a battalia of enemy Foote had got in there before him.
Still…orders were orders…and they did have a secret weapon up their sleeve.
Taking advantage of a lull in the fighting Paulet and his lads marched onto the bridge unopposed and saw the way to the fortress gates were unimpeded.
The next activation was Parliamentary and Essex had no choice but to send his remaining horse regiment on that flank to charge Paulet’s infantry while still in a vulnerable column.
The outcome wouldn’t have been a good one for the Royalists but even as the horse began to move Paulet used his « Gadzooks » burn card - stopping the enemy in their tracks and allowing him to reactivate his brigade.
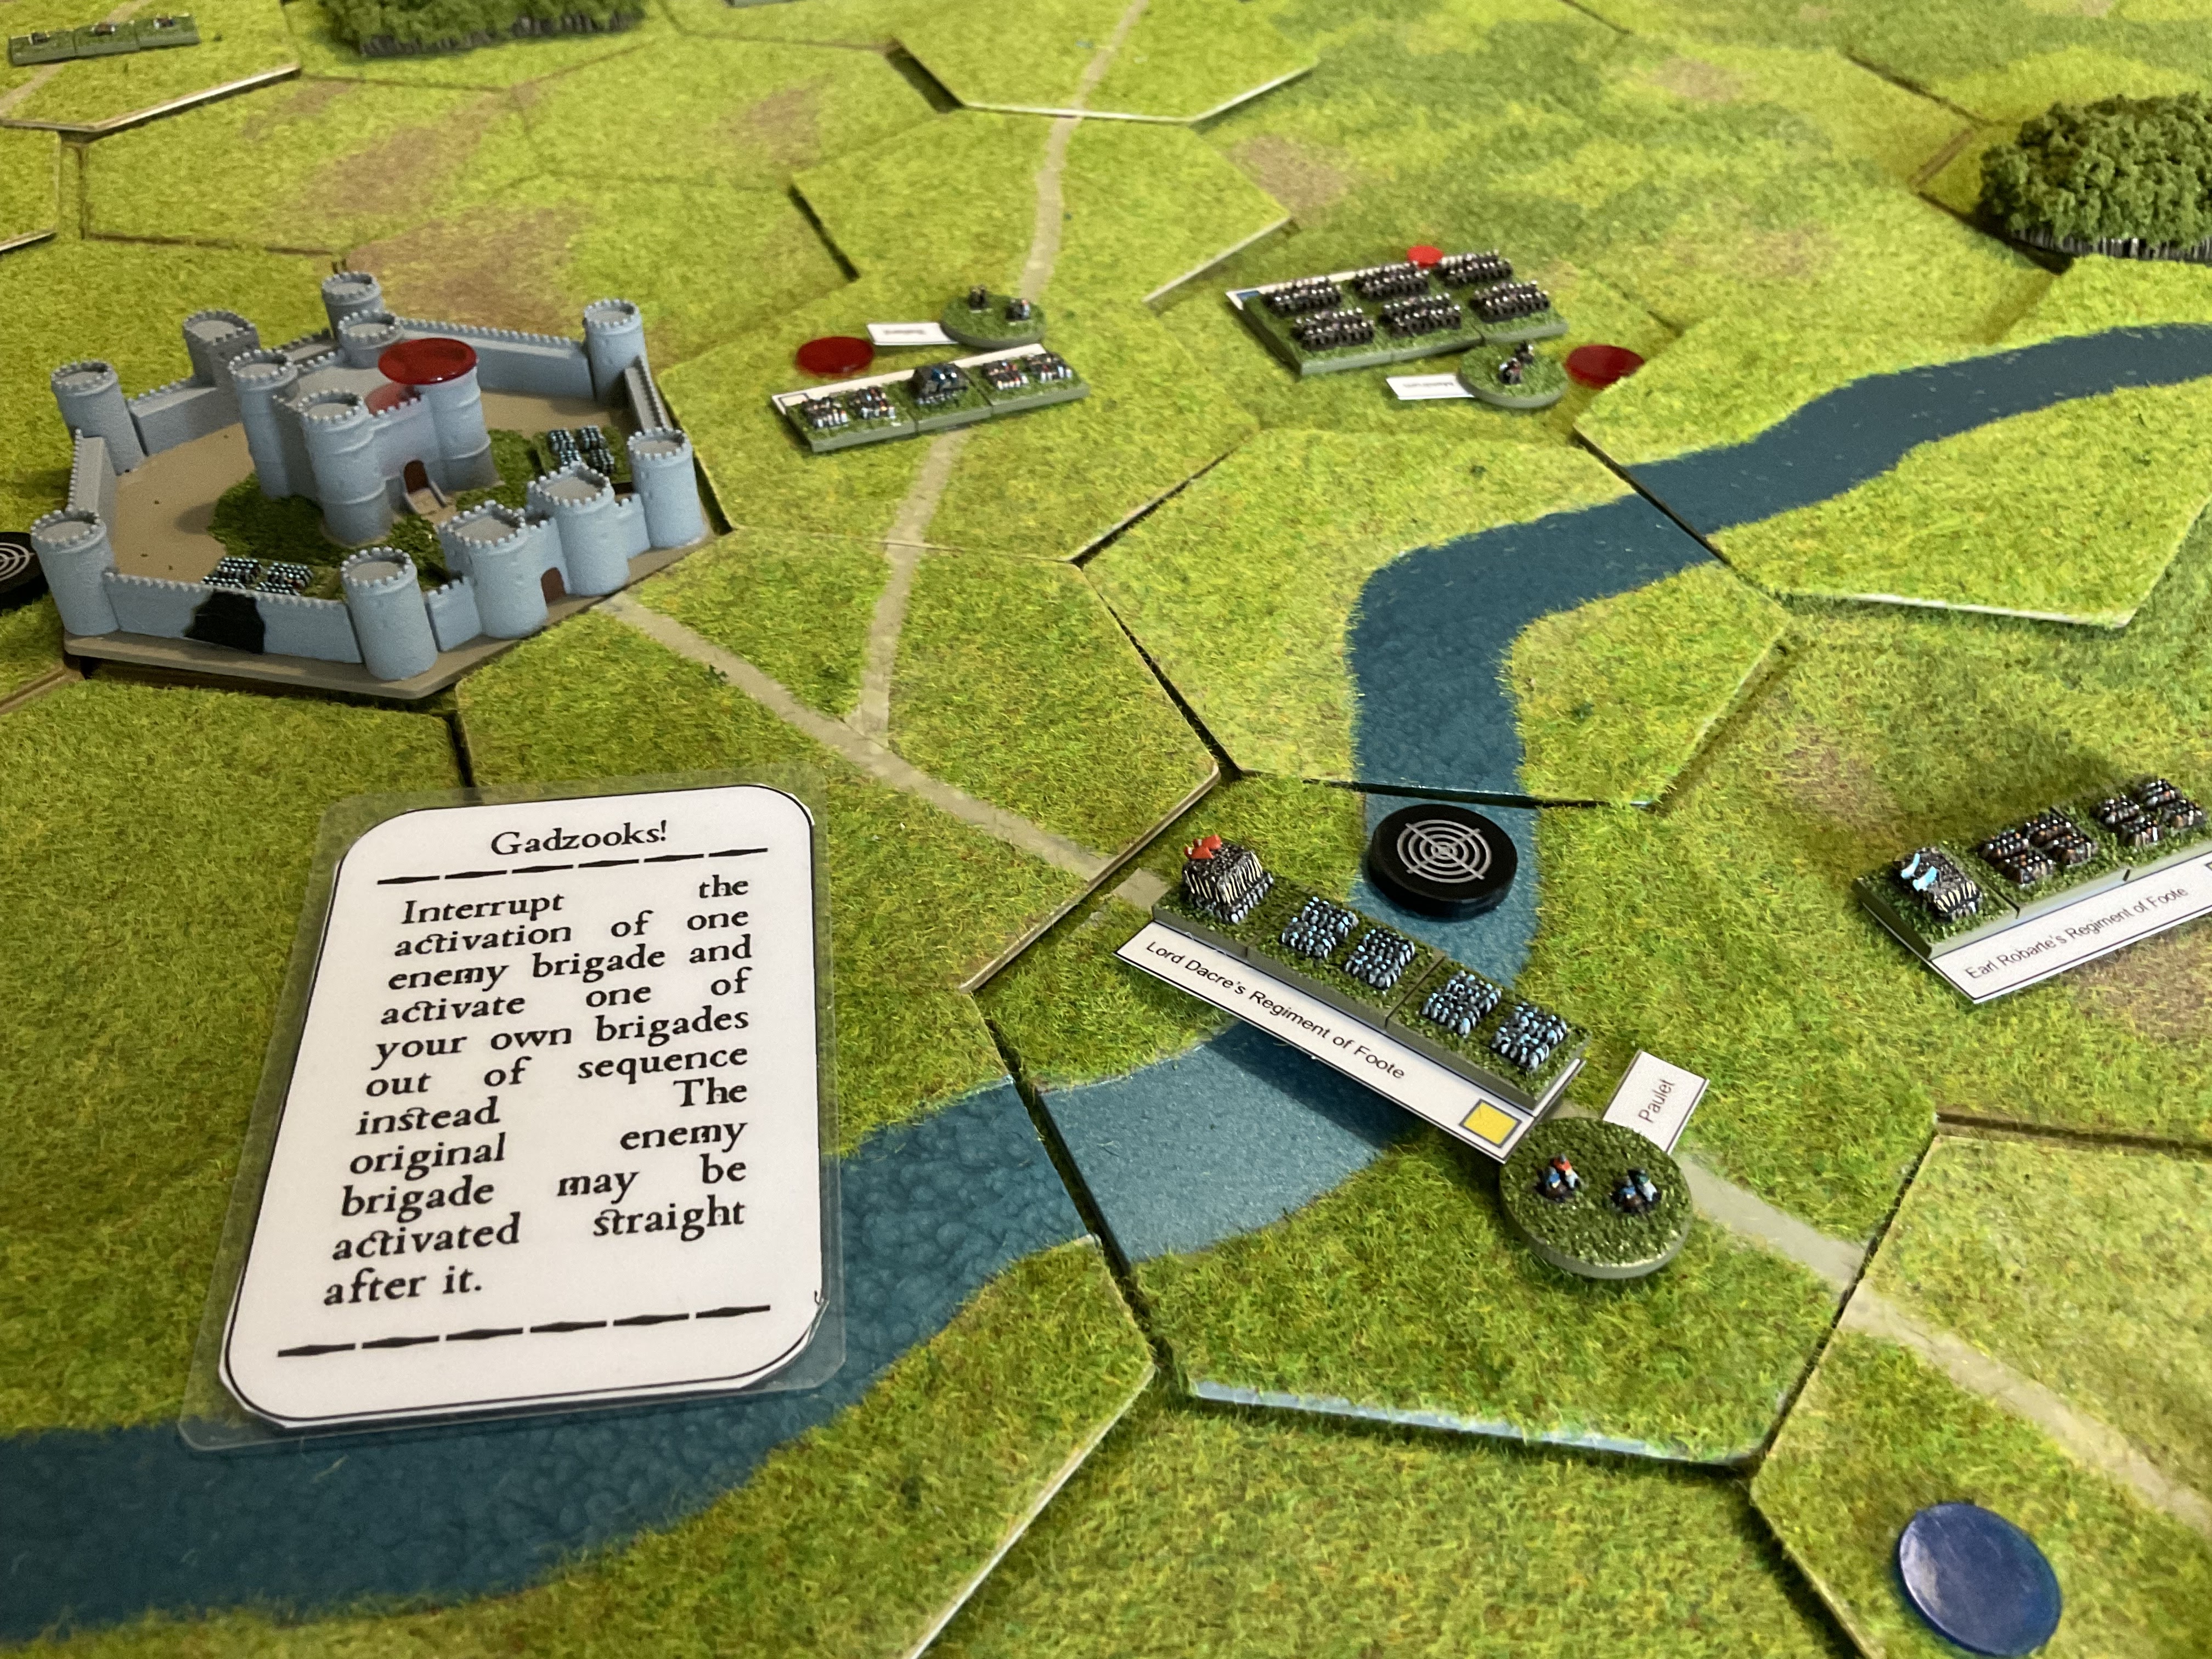
Shrugging off desultory fire from the castle walls Paulet’s men made their way around to the breach and the first storming parties went in - safe in the knowledge that reinforcements were crossing the bridge behind them.
Against the odds the storm was a success and Ballard and his Parliamentary troops made a rapid exit through a rear postern gate with only minimal losses.
Paulet gave orders to man the walls and begin filling the breach, the better to defend themselves. Suddenly the scores had shifted dramatically. Parliament had just lost the 2 victory points for occupying the castle and the Royalists had gained them. The scores now stood at 7 to 1.
With but two turns left, a crushing defeat for Essex seemed inevitable.
And then things changed.
Rapidly.
Regaining the initiative Ballard’s brigade surrounded the castle and staged a storm of their own. Despite the benefit of its stone defences the now defending Royalists took casualties and worst of all their heroic leader Paulet was slain by a shot through his manly breast (he actually fell down the castle stairs clutching a bottle of sack and broke his neck, but hey, details).
 |
| Whenever a unit with a leader takes casualties in combat you have to check if the accompanying leader is hit. You have to be pretty unlucky to get the two crossed sabres required. But unfortunately for Paulet…it is possible. |
Worse was to come for on the very last turn, Ballard’s brigade re occupied the castle and destroyed the Royalist reinforcements struggling to get off the bridge. The scores swung dramatically the other way. Essex now had 2 points for the castle, 2 points for the destruction of 2 Royalist foot battalia 1 point for killing of Wilmots regiment of horse and 1 point for killing Colonel Paulet. Hopton had 3 points for breaching the castle walls and 2 points for routing the Parliamentary horse earlier.
Turn 12 ended and the game was over. Neither side had reached 8 points during it for an immediate win but Essex with 6 victory points to Hopton’s 5 was quick to send letters to London proclaiming his triumph.
With the light fading Hopton’s army conceded the field and made camp three miles south.
Right oh - were back to the strategic map next. Parliament has six points to spend on it followed by the Royalists three. Both sides will also get a number of guaranteed settlements joining their cause this turn in Cornwall / Wales and in East Anglia / Lincolnshire.
Observations on the battle.
Both sides had the flank order option allowing them to send a brigade off board only to reappear later on the other side of the river. Neither took it. It might have prevented the necessity of the opposed river crossing shambles that actually occurred.
Hopton was able to score 1 point for each hit on the enemy castle walls. He could have just stayed put and chanced his arm on inflicting more hits after causing the breach - though this was not guaranteed of course. He could have brought more guns with him too, though to be fair he didn’t know beforehand that his army would be engaged in a siege.
Both sides stuck to having three brigade commanders but could have had up to 5 if they’d chosen a different force mix. A small brigade of say 2 Foote with an order to flank march at the outset may have been decisive.
Toodleooh.
Fascinating action and quite exciting. The wild swings in fortune are almost unbelievable. With Hopton up 7-1 to ending in a draw at 6-5, this shows an amazing turn-around for Essex. Talk about snatching victory from the jaws of defeat.
ReplyDeleteCheers Jon, the castle changing hands so many times was most unexpected and contributed to the bizarre outcome.
DeleteI’m sure the King will want to question Hopton on why he didn’t sit on his early advantage. Hopton’s rivals, who were questioning why such a low born man was given a command of such importance, are now actively seeking his replacement. Will the King bend or be loyal? And whither the Cornish crusade to make the heathens put the jam on first?
ReplyDeleteChris/Nundanket
I didn’t see the possibility of sitting back and firing at the castle until after the game was finished. I also genuinely thought that seizing the castle was unlikely to be reversed in the time available.
DeleteAbsolutely. Besides, the aim was to capture the castle so sitting back, especially when things are going your way, would not have gone down well in the new court at Brumagem.
DeleteChris/Nundanket
Well it is early war where no-one has a scooby about tactics and the troops are pretty raw too. Plus Essex wasn't the most dynamic of commanders (Unless you compare him to Manchester). Great AAR BTW.
ReplyDeleteThanks man. All true.
DeleteWell, that WAS a turn up for the books, as Jon says - first, you gave us a teaser of a Parliamentarian comeback - then snatched it away by announcing a 7 - 1 lead for the Royalists - and then it all goes to hell in a hand cart for them and the Parliamentarians storm back into the castle - fantastic stuff JBM!
ReplyDeleteCheers Keith, took me by surprise too.
DeleteA very satisfying game, especially from a solo point of view …. For the player / designer to be taken by surprise is splendid.
ReplyDeleteI think I’m getting as much fun out of this as anyone…which is how it’s meant to be I guess!
Deletegreat looking pics. I especially like the castle and that units can fit inside. As i don't know the history very well or who the players are I feel like I can root for either side. 😁
ReplyDeleteCheers Stew, it’s bloody hard taking piccies of 2mm troops. Never does them justice. Oddly enough I don’t feel like I have a dog in the race when it comes to the ACW or AWI. I never know who I should be supporting in these conflicts.
DeleteWell that was a turn up for the books, make no mistake about it! Obviously the fervent prayers actually paid off in the end;). Great AAR and good photos of the game too, which as we all know is damned hard to do with 2mm figures!
ReplyDeleteHi Steve, I should probably take future photos through a microscope. It has to be said that it’s one of the shortcomings of this scale. Looks okay when your playing with them mind you.
DeleteExcellent report and a surprising turnaround! Keeping us on the edge if our seats, looks like Essex won't need the coffin he's travelling with after all!
ReplyDeleteBest Iain caveadsum1471
Hey Iain, it was a hell of a twist in the tale wasn’t it?! Might be a bit early for Essex to ditch the coffin just yet.
DeleteA Thoroughly enjoyable battle report JBM…
ReplyDeleteWho would have thought that there would have been such a turnaround of fortunes…
You are responsible for a renewal in my interest in pike and shot… I will bill you for the upcoming costs… 🤣😂🤣
All the best. Aly
Hey Aly, jeez I hope you don’t… I might have to sell my other kidney to cover it. lol.
DeleteGreat report, and I loved how the battle kept swinging to and fro as the castle changed hands repeatedly! 2mms look pretty good, it occurs that a really big battle could look amazing and fit on a reasonable table - Marston Moor anyone?
ReplyDeleteThanks mate - I probably have enough units for marston moor but I suspect that after this campaign is over there’ll be other projects taking over for a bit, you know serious stuff like space Nazis and such. lol. I
DeleteWith that said I’ve decided not to sell my collections off when I’ve finished with them (like I used to), so another use would be refighting some of the better known big battles from time to time.
A most interesting narrative to the game, and I do like your 2mm setup.
ReplyDeleteThanks Peter. Praise indeed.
Delete