Friday, 17 December 2021

The devil makes work…

For idle hands to do…

What I really did not need at the moment is another project. I’m currently painting Star Trek figures for my “Trek Hulk” mashup, Neanderthals for my Paleo diet campaign, and another unit of British infantry for the VSF project.

Modiphius 18mm Trek - based on clear acrylic rather than the manhole covers they actually come with.

Unfortunately I recently had time to browse the internet a few extra quid in the bank and the urgent need for some some morale boosting retail therapy.

I was not going to get involved in anything new. As I said above, I really didn’t need another project. 

Absolutely not. 

No way. 

No.

Oh bugger… 

Mr Mersey has a new early dark age set of rules out called “Age of Penda”  (available on wargames vault)

Dammit. 

I’ve been a fan of this particular rules meister since I purchased “glutter of ravens” off him way back when - so I downloaded them quicker than my French PayPal account could say ping. 

There’s a lot of familiar stuff of course - but there’s an interesting blend of other elements in there as well. I spotted a bit of DBA, a bit of Dux Bellorum, a bit of twisted TTS (off set gridded squares…mmm) even a bit of SAGA (sort of) with an unusual tactics battle board affair. He has a nice set of 18mm figures ready to support the rules, (sculpted by Copplestone) and as a dark age rivet counter (if there could possibly be such a thing) I have to say I like them a lot. 

Wiglafminiatures.com - coming to a distributor near you…soon.

There seems to be an issue with distribution at the moment but I don’t think that’ll take long to overcome.

Anywhoo - I’ve got the rules, I’ve got the ability to quickly add squares to an unused battlemat, but I just need to settle on a scale. The 18mm figures look splendid, but then there’s Kalistra 12mm, Baccus 6mm and god help me irregular 2mm. What’s a boy to do?

Also…what’s up with those Citadel contrast paints? I bought the black and the blue for the Trek figures and even got the special undercoat spray to make the paint “work” but all I ended up with was a disconcerting mess and something that seemed neither paint nor ink. Maybe I’m doing something wrong?

Hey ho. 

TTFN

Thursday, 16 December 2021

Major Clanger's hat

I'd set up a game yesterday to work through my own set of 2mm ECW rules and Major Clanger (as he now styles himself) came along to play the opposition.

After a series of interruptions and a very distracted set up I grabbed dice, order counters, and the A.I deployment cards and had at it. I took a few piccies and had just got everything ready when real life called a halt to proceedings before they'd really begun, (yes at 58 I'm still being called in from playing to have my tea!)

Deleting the few images relating to the abortive game this morning, I noticed there was something not quite right going on.


Maybe you can spot it?

Clanger's new hat is courtesy of the nimble fingered current Mrs Broom by the way. 

Tuesday, 14 December 2021

The death of innocence

Margot, aka…Margymo, little mo, sugar boo, mookymoo, the ginger rocket, croissant, super cat. 

06/06/20 - 10/12/21


Everything that you love will be taken away.

Wednesday, 1 December 2021

The battle of Bridgetown

Okay then, welcome back to the world of eye strain that is 2mm gaming. Best get yer specs on I reckon.

Given the victory conditions required to win this battle (see previous post) I felt it was better to concentrate on capturing just the one bridge rather than splitting my forces over the two. The enemy on my right flank seemed the weakest so I deployed the more mobile part of my forces accordingly.

The two C&C cards I chose out of my four card hand allowance support this plan, and the remaining two, drawn randomly, turned out to be useful too. Of course once the chosen cards had been used I was dependant on what came out of the deck…which seemed fair since no plan ever survives contact with the enemy.

My initial intentions. Foot in blue, small units of horse in red, and artillery in yellow. There you go. Clear as mud.

I’ve felt for a while that I needed an actual opponent in my wargaming, and as you can see “Small Clanger” took on the role of opposing generalissimo for this occasion.

Don’t be fooled by all that children’s tv cuddliness. He’s got a drink problem, bad breath, and a foul temper.*

I got to kick off proceedings and the first card I played allowed me to move all eligible units in one game section. For those who’ve never played C&C before the battlefield is divided into two wings and centre, and I offer that up only for general info…there won’t be a test afterwards I promise.

My small regiments of horse were sent straight off in the direction of the bridge, determined to do their worst against  any enemy blocking their path.

Turn 1. My small horse regiments gallop over the heath towards the bridge. Using the pre chosen cards meant I was able to get off to a good start.

Turn 1. SC moves his right flank Dutch school horse cautiously towards my forces, masking his artillery in the process. 

Turn 2. The cavalry charges go in, with mixed results. A regiment of horse is forced to retire by preemptive fire from the defending foot and while casualties are inflicted on the foot nearest to the bridge they are prevented from retiring by their heroic Brigadier.

Turn 2. Small Clangers foot advance down the road and into the first of the enclosures, while his mounted dragoons move through the narrow alleyways of the town in the hope of preventing me seizing the best defensive terrain.

Turn 3. And just like that the Parliamentarian left flank collapsed. My reorganised horse charged the guns previously on the right of the picture, destroyed them with no loss, took a breakthrough move into the empty hex and then hit the next enemy unit in line with a bonus attack. An almost identical outcome occurred to the right of the picture. If the destruction of units had equated to victory banners (for me) I’d have gained four out of the five required!

Turn 3. The Clangers reserve horse regiments cross the river to reinforce the centre - or intervene on his left flank.

Turn 4. Disaster! The first regiment of horse to cross the bridge and hit the defending foot on the far side helped to determine the Roundheads “raw” status (red counter) but were rudely handled and thrown back in confusion. The follow up regiment of horse also took a hit when attacking but this damage was doubled when they were unable to retire into the hex behind them as required by the dice. 

Turn 4. The disaster continues to unfold. Clanger’s brave foot wade into my retreating unit on the bridge and finish them off in melee. The only bright spot is the loss of his foot unit on the riverbank which came about in a spirited back and forth that cost me another hit. The score is one nil to him at this point.

Between turns 5 and 8 there was a lot of manoeuvre and further casualties were inflicted - mostly on my forces. 

By turn 9, pictured below I had captured the bridge, giving me three victory banners and he had destroyed 3 of my units giving him three victory banners. I needed to hold the bridge for a further two turns to give me the 5 victory banners required to win. 

My small horse regiment holding the bridge was battered and only had one hit left in it. My foot were making best possible speed (given the cards I had) in their direction, ignoring the enemy dragoons now firing into their flank from the enclosures and the two full regiments of Dutch tactics horse marshalling on the road outside of the town. Clanger needed to destroy two more of my units to reach his five banner target.


Turn 9. I control the bridge and try to hurry my foot along to give the horse some support. The raw Parliament foot still holding the far bank refuses to die

Turn 10. I held the bridge against a final do or die attack by the raw Parliament foot, which resulted in their elimination and me effectively gaining one more victory banner for holding the bridge for a full turn (4 out of 5).  Unfortunately his cavalry charged from the road and destroyed one of  my advancing foot units giving him the 5 banners he needed to win. Another case of a bridge too far I suspect.

Thoughts and observations

Unfortunately 2mm doesn’t really make for a blog friendly picture fest, as you will have observed, but it does have a small playing footprint and still gives an enjoyable game. Set up took 10 minutes and the game itself was over in two hours. I suspect its the sort of game I’ll probably play without bothering to report on it here, and now the units and terrain have been created I’ll have the freedom to experiment with my own hexed rules in the future as well as C&C. 

If 2mm was an itch…I can now consider it well scratched.

In this battle I was keen to capture the bridge as quickly as possible, using fast but brittle small horse units to get to it before  Small Clanger could counter by redeploying reinforcements. As it turned out I might have been better grinding slowly forward with my more resilient foot, but hey ho…could’ve would’ve should’ve, eh. Despite this mistake the outcome was in the balance right up to the end and was the closest fought engagement I’ve played for ages.

Something bigger next time I think.

And finally…

Small Clanger taunts me with a brief victory dance before going off into the cupboard to get drunk.

TTFN

*After the series was cancelled in ’72 most of the cast had trouble coming to terms with their lost celebrity status. Many tragically turned to drink and drugs. 

In 1975 The Soup Dragon was caught shoplifting in Finefayre and in ’76 the Iron Chicken was arrested for possession with intent to supply. 

Tragic.


Sunday, 28 November 2021

C&C ECW reloaded

I’ve been on a bit of an ECW tip lately and have been experimenting with a number of published and unpublished rules. The main thing to come from all this dabbling was the realisation that nothing matched up to Msr Foy’s excellent C&C ECW set. The built in card mechanic suffices as a crude A.I, the game itself doesn’t overly tax my noggin’ and of course there’s hexes…lots of lovely hexes!

Now my original C&C cards are still, I suspect, in La Maziere Aux Bons Hommes, and the only ECW forces I own these days are my 2mm ones, so a degree of work was required to get things up and running. After a four week wait for a new 2ft x 1.5ft game mat and a whole heap of printing…I’m finally there.

Elenderil over at “Small But Perfectly Formed” kindly let me nick a map and set up of his from a 2mm game he ran back in 2018. I’ve twisted it through 90 degrees to better fit with the hexes and altered some of the forces to accommodate the C&C model - otherwise everything else remains broadly the same.

The situation:

It’s 1643 and a Royalist force is making its way out of Wales in order to reinforce the King at Oxford. At a river crossing into the Midlands they find their way blocked by a small Parliamentary army.

Objectives:

The Royalists will earn 3 Victory Banners for each bridge hex they occupy, plus 1 Victory Banner after that for each turn they remain in occupation of it. The Parliamentarians will earn 1 Victory Banner for each Royalist unit they destroy. The game ends automatically with a win for the side that is the first to score 5 Victory Banners.

Parliament’s forces set up first and are controlled directly by the C&C cards, the Royalists set up second and are controlled by me. The Roundheads may deploy anywhere within the first three hex rows, the cavaliers within the first two.

Put yer specs on! 

The battlefield seen from the Royalist left flank.

Elenderil’s original map of Bridgetown

Both factions are allowed four command cards in their hand at any one time.

Terrain: The river may only be crossed via the bridges.

Forces: 

Parliament

3 x artillery - trained

2 x horse (Dutch tactics) - trained

2 x horse (Dutch tactics) - raw

1 x dragoons - trained

2 x foot - raw

2 x foot - trained

1 x C in C

3 x leaders

Royalist

3 x artillery - trained

1 x horse - veteran

4 x foot - trained

2 x foot (small units) - trained

5 x horse (small units) - trained

1 x C in C

4 x leaders

Told you you’d need your specs. Parliament’s left flank deployment with artillery covering any approach down the road.

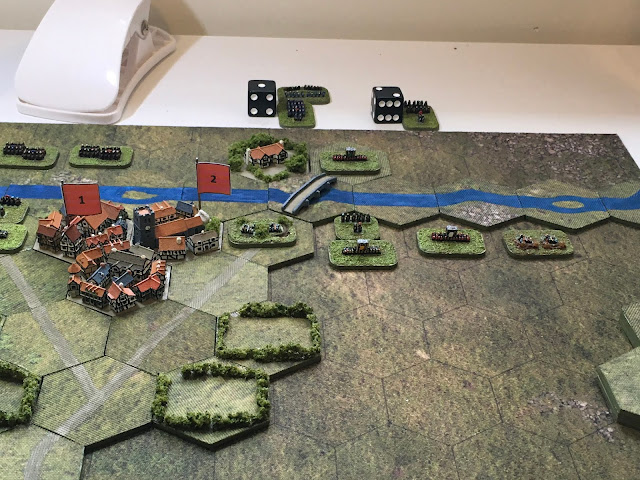
Parliament centre. The numbered flags indicate which of two units behind the map occupy the building hexes since the unit bases won’t fit between the houses! I’ll use this system for woods as well.

Parliament right flank, with two horse regiments in reserve over the river and a series of enclosures bordering the road.

Game rule tweaks:

No plan survives contact with the enemy: I will initially choose two of the cards from my four hand allowance to support my overall strategy, thereinafter I will make the best use of fresh cards that are drawn from the deck. 

The element of surprise: The Parliamentary player will have his command cards dealt blind and left face down. 1 card will be revealed from his hand each turn and acted upon. Once used and discarded it’s replacement will also be concealed. The status of Parliamentary units (raw in this case) will only be revealed when a unit becomes involved in combat. Status will be determined by die roll - a process that will cease in this particular game once two foot and two horse units have been marked up.

Size doesn’t matter: Small units lose 1 combat dice and have one less hit capacity than a regular sized unit. For example, a normal sized foot regiment can absorb three hits before destruction, a small foot unit only two. Correspondingly, large units can absorb 1 extra hit before destruction, though none are listed as such in this scenario. Note a unit may always roll 1 fire combat dice.

Range reduction: Given the scale of the units, muskets may only be fired into an adjacent hex, not two hexes as per the regular rules, this effectively reduces foot to a melee capability only but veteran units gain +1 combat dice anyway, perhaps reflecting firing by salvee.

Preemptive fire: Trotter (Dutch tactics) cavalry being charged by galloper (Swedish tactics) cavalry may fire at their attackers before they enter into melee - however the attacking unit may not start from an adjacent hex. The trotters (not Del and Rodney) may roll 1 combat dice whose results will impact the charging gallopers before the melee they are instigating takes place. If preemptive fire is utilised then the trotters must deduct 1 die from their usual melee battle back allowance. Note a flag result from preemptive fire will cause the gallopers to pull up short and not enter melee even if a leader is attached to the unit.

Foot and commanded shot may adopt a similar tactic unless raw.

A unit may only use preemptive fire once per turn. 

Since I now have the luxury of leaving this pocket handkerchief sized battlefield out for as long as I want I’ll cover the Royalist deployment and the battle itself in the next post. Hopefully the brief delay will allow you to make a quick visit to Specsavers. Lol.

TTFN


Friday, 19 November 2021

New directions

Bugger me it’s been a year since I started this blog…

Man that went quick.

If you look back at the first few posts it’s pretty clear that a lot has changed for me gaming wise in that short space of time and a few months ago I embarked on a brief reappraisal of what I wanted from the hobby - and what was really possible in my more modern space restrictive environment. 

The long and the short of it has been a move towards pocket sized armies and limited board sizes. The WOTR troops have gone, along with the Wofun flats, 6mm ECW, the Viking and Saxon armies and all of the ship models that were going to be part of my early Elizabethan naval gaming.

Sometimes the enthusiasm wanes never to be rekindled (Viking, Saxon & WOTR), sometimes you can’t find the the right rules, minis or scale, (Wofun & Elizabethan naval) and sometimes you discover that some types or periods of warfare are just not that rewarding to try and recreate, (I’m looking at you cogs). 

Reluctantly I’ve come to the conclusion that for me the days of large armies big tables and deep pockets have probably gone - though thankfully there still seems to be fun to be had!

Branching out into smaller scales and completely new genre’s like VSF has rekindled my enthusiasm and made new projects do-able again. Happily this blogs little band of cognoscenti have been willing to tolerate the drift…so far. 

So, along with 2mm ECW and the ongoing VSF campaign I’ve decided to double down by testing the patience of the blogs readership yet further.

There’ll likely be some 15mm VBCW and dreadnaughty naval stuff coming up in the new year but the projects actually in the pipeline at the moment include these guys…

Igg, Ogg…and Dave, with the Paleo Diet rules 

Roll a 1 and you might get assimilated.

Plus some Star Trek shenanigans - using the old Space Hulk rules.

They all tick the pocket sized, campaign friendly boxes, have established rules …and more importantly are now in the pipeline at Broom towers.

You have been warned, lol.

As a quick bye the bye, I’ve also developed a hankering for this solo card game…

Spearpoint 43 - now with added Russianfrontyness.

so if anyone already has it, or has any views on it - I’d be keen to hear them.

TTFN

Tuesday, 9 November 2021

No retreat, no surrender!

Sorry miss but the dog ate my homework… 

Actually Margot or Kiki sat on my iPad and deleted the batrep for this battle by accident (well they said it was an accident - but we did run out of cat treats in the week so it could have been passive aggressive payback for that I suppose?). 

Anywhoo I still have the pictures I took of the affair so without much of the usual blow by blow fluff here’s a pictorial explanation of what happened to the brave defenders of Victoria’s realm. Consider it a sort of Broom Battle Picture Library.

Sergeant Hobbes and the wounded Corporal Figgis had escaped the emerging Prussian soldiers (see last vsf post) and had made it to the bridge over the Lud, just east of Peveril. On their approach shouts from across the river alerted them to a rash of freshly dug mounds and an instruction to “get a ruddy move on”.

Unseen but closing fast was a large force of Martians intent on crossing the bridge in order to get at any “food on the hoof” in the nearby town. 

To avoid the pathogens that had wiped out their initial reconnaissance force the Martians had begun herding captive humans into machines that extracted and sterilized their blood. Though a coldly efficient solution whose industrial scale could help sustain the larger invasion force, it faced a completely unanticipated problem in a now vengefully non compliant civilian population - typified by the proud badge wearing members of the “take one with you” movement who would ingest lethal toxins or immolate themselves on the alien energy barriers rather than provide sustenance. 

Suffice it to say there were a lot of Martians now on British soil and most of them were bloody hungry.

Hobbes, Figgis and the rest of the section survivors head toward the bridge, chivvied on by soldiers defending the far river bank. Can you guess what the square markers in each hex represent? Note also the wisps of smoke rising from behind the hill.
On the other side of the river they encounter a scratch force of defenders tasked with buying time for the  civilians in Peveril to be evacuated.
Concealed in the tree line on the riverbank is a 6 pounder and crew covering the approaches to the bridge. The crew have erected their ceramic / asbestos shield in the hope of lasting longer than 20 minutes* against a heat ray wielding Tripod.

Troopers from the 23rd Lancers with lance bourne sticky bombs wait nervously in the tree line for the onslaught to begin.

And here they come!

Remember boys…aim low!

Alien hover / disability scooters…whatever next?

Smoke on the horizon…but lunch awaits just over the bridge.

Spang! The 6 pounder opens up and scores a direct hit on the nearest Tripod. Momentarily dazed the alien machine fires back…with deadly black smoke. Good job the gunners were wearing their gas masks! Around the tripods feet the Martian Infantry swarm forward to suppress the defenders gunfire.

Hobbes spreads his men out into a firing line as the Martian scooters swoosh towards the river bank.

Yup you guessed it. Those squares were mines triggered by a turn end numbered card draw. Mine number 9 goes off too late to catch the “speeding” mobility scooters. Lucky buggers!

But they were not so lucky this time…gotcha!

The Martians had retuned their small arms from the cinematic but useless “pew pew” setting to nundanket’s suggested “zhush”, pinning the brave defenders in place until… what’s that coming over the hill is it a monster?** No it’s a Wobbler! The Bazalgette armoured steam Walker (to be precise) finally makes its combat debut! 

In the nick of time the clanking swaying behemoth stomped its way to the bridge…and broke down.

Casualties begin to mount as the new “zhush” setting on the Martian weapons take their toll. Tragically Corporal Figgis is reduced to ash as he tries to collect a gambling debt from a wounded colleague. Oh yes some artillery bods died too, when their masks stopped working (they’re only guaranteed for 5 minutes in a toxic environment you know).

The two colossi traded shots, the canon on the wobbler scoring solid hits, but the heat ray from the Tripod failing to hurt the brave British artillery men behind their asbestos lined armour. With both armies nearing their “bottle out” casualty levels things quickly came to a head.

The starboard Gatling didn’t jam…but it did turn these purple monsters into something resembling jam, so there’s that.

Charge! The lancers take advantage of the wobblers appearance to splash across the river and hit the  nearest Tripod where it hurts. That’s in the legs by the way. I don’t think the Martians have genitals. No need if you do your reproduction by budding I suppose. Shame that. They’re missing out.

The lancers cut their way through the supporting Martian Infantry and speared the nearest Tripods legs with two sticky bombs. As they wheeled to make their escape they pulled the friction detonator chord and moments later…Kaboom!

Tragically one of the Lancers fell to yet more “zhush” fire but as the Tripod toppled the Martians found they’d had a different kind of belly full to the one they’d been expecting…a belly full of British steel. Resolve broken the beastly aliens began to withdraw. What? Oh bloody hell, go on then…HUZZAH!

The Martians had fancied themselves the natural conquerors of our solar system, but in their hubris they had stirred to life a far more powerful foe than they could ever have imagined, for the most naturally warlike species, the species with the greatest capacity for destruction had always been mankind.

* 20 minute lifespan from deployment to engagement. Apologies to messrs Elton and Curtiss.

** With yet more apologies, but this time to The Automatic.